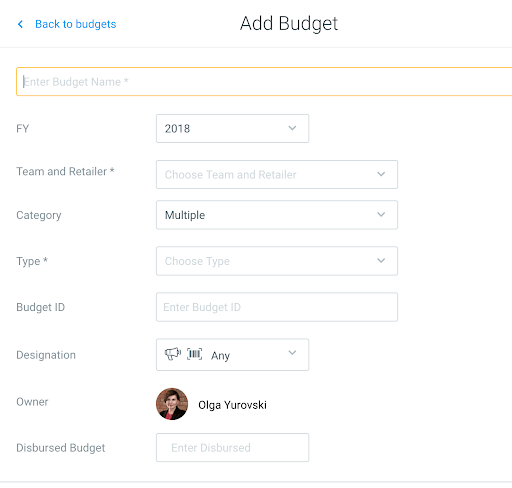
1. To create a new budget, navigate to the Budgets page. Click on the yellow Add Budget button on the top right of the screen.
2. In the side bar that opens, fill out the required and optional fields:

- Budget Name: Pick a descriptive name for your budget. You should be able to easily recognize it if you have many budgets to manage.
- Team and Retailer: Select which retail customer or team to which this budget is assigned.
- Category: Define budget rules and restrictions by selecting which Category, Brand and Product the budget can be spent on. For Brand-agnostic budgets, keep the default “Multiple” option.
- Type: These are pre-determined types of funds that are defined by your organization’s admin that will help you track different sources of funds.
- Budget ID: If your company uses unique alphanumeric budget IDs, you can enter it here.
- Designation: You can specify if the budget is explicitly for media, insertion fees, or coupon redemption. If you leave the default value as “Any”, the budget will be available to fund any type of spend.
- Owner: The person who creates a budget will be its owner by default, but you can assign budget ownership to another team member who has Budget Owner level permissions.
- Disbursed Budget: Enter the budget disbursed amount to communicate to the team how much spend is available for planning.
- You can also add notes or upload file attachments, such as a marketing brief, to any budget.
Once the budget is created, anyone on your team can see the source of funds, how much is available to spend, and what rules, if any, exist around the budget.
As your team plans events and applies the budget to fund specific tactics, the middle Section Allocated to [X] Events will populate and allow you to see where the funds from this budget go.